YOU+ is a premium subscription plan designed to upgrade your YouApp experience. It unlocks several premium features like access to full metaphysics content including Unlimited I Ching Readings, Tarot Readings, BaZi, Numerology, Horoscope, Zodiac and many more. YOU+ also gets you instant conversations; unlimited likes, see who liked you, and advanced match preferences.
Upon subscribing to YOU+, the payment details you provided will be charged based on the subscription plan you select – monthly, quarterly, or yearly.
You can easily subscribe to YOU+ by visiting YouApp > YouApp Premium (YOU+), reviewing the plan details, and tapping on “Subscribe”. Follow the checkout steps with Apple/Google Pay.
You can cancel your YOU+ subscription at any time from the subscription details section within your account settings. However, the changes will take effect starting the next billing cycle and will not apply retroactively.
To sign up for YOU+, please follow these steps:
- Open your YouApp
- Go to YouApp Premium (YOU+)
- Review the plan details
- Click “Subscribe”
- Checkout with Google/Apple Pay
YOU+ accepts subscription payments through Apple Pay and Google Pay.
While we hate to see you go, you can cancel your YOU+ subscription anytime. However, please note that the cancellation only applies to the next billing cycle; thus, no refunds will be issued for the current subscription period.
Welcome to YouApp! Meet people by fate for work, play and dates! YouApp integrates Western, Indian, and Eastern philosophies such as Astrology, Horoscopes (星座), Chinese Zodiac (生肖), and BaZi (八字) to offer immersive dating experiences, vibrant communities, exciting experiences & events, and connections with like-minded groups and communities.
The minimum age requirement for using YouApp is at least eighteen (18) years old.
Android:
- Follow the link to download at Play Store: https://play.google.com/store/apps/details?id=com.youapp.you_app&hl=id
- Press Download.
- After you have downloaded, press Install.
- After you have installed, press Open
- Proceed to login with your Facebook, Google or Apple Id or Mobile number or Email.
iOS:
- Follow the link to download at App Store: https://itunes.apple.com/app/youapp-ai/id6444595490
- Press Get.
- After you have downloaded and installed, press Open
- Proceed to login with your Facebook, Google or Apple Id or Mobile number or Email.
App Gallery:
- Follow the link to download at Huawei App Gallery: https://appgallery.huawei.com/app/C108871605
- Press Install.
- After you have downloaded and installed, press Open
- Proceed to login with your Facebook, Google or Apple Id or Mobile number or Email.
If you haven’t already done so, please download YouApp from the Apple App Store, Google Play Store and Huawei App Galery. Once the app has been installed, you can log in with your socials or sign up for a new account using your phone number and email.
- Click on the top left YouApp icon.
- Go to “Refer a Friend”.
- Share your QR code or invite link to your friend.
- Your friend will need to login on the web link with their socials or mobile number to confirm the referral.
Go to Matches in YouApp and find a match!
Android: To import contacts from your device, navigate to Messages from the Main Tab; and select Contacts and Invite from phone contacts; if it is the first time, allow YouApp to access your contacts.
iOS: To import contacts from your device, navigate to Messages from the Main Tab; and select Contacts and tap on Invite from phone contacts; if it is the first time, allow YouApp to access your contacts.
REN coins are YouApp’s in-app points for transactions of services listed on the platform. It is used within the YouApp ecosystem only, allowing users to purchase services from merchants within the app.
To get REN Coins, users must purchase REN coins on YouApp.
- Navigate to the top left YouApp icon to open up the side menu.
- In the side menu, navigate to Get REN Coins.
- In the Get REN Coins page, you may view your existing REN Tier and REN Coin balance. Click on the Get REN Coins at the bottom of the page to proceed to purchase.
- Enter the amount of currency of REN (enter only numbers) that you wish to purchase and press continue. The minimum amount is 780 REN.
- Select the payment method that you wish to pay with and the estimated price will be stated. Click on confirm to proceed to the Transaction page.
- In the transaction page powered by Stripe, enter your details to pay. This information is provided to Stripe only, YouApp does not store any information in this page.
- You may receive OTP confirmation via your bank. Proceed to enter the OTP to complete the purchase.
- Upon successful payment, you will receive your REN Coins in the Get REN Coins page.
1 REN is estimated at 0.011 SGD.
1 SGD = 91 REN
1 REN = 0.22 ZEN
ZEN serves as in-app points that you earn and store in your business account after successfully selling experiences, events, or groups. To access the ZEN you’ve received, you need to complete the Individual or Business KYC verification. Once your KYC is verified, you’ll be able to unlock access to your business account and view the ZEN you’ve earned.
1 ZEN is estimated at 0.058 SGD
1 SGD = 17.16 ZEN
1 ZEN = 4.55 REN
Diamonds are in-app points within the YouApp ecosystem, exclusively used to buy virtual gifts that users can send to one another in chats. Diamonds can be purchased via debit/credit cards, REN Coins and Apple Pay.
1 Diamond is estimated at 0.015 SGD
1 SGD = 66.66 Diamonds
1 Diamond = 1.365 REN
The billing for your YOU+ subscription will commence right after your purchase is confirmed. The recurring billing cycle corresponds to the subscription plan you’ve chosen – it could be every month, every three months, or every year.
All purchases are final, and there will be no refunds for unused periods of subscriptions.
To view your transaction history, follow these steps:
- Click on the YouApp logo located at the top left corner of the screen.
- The sidebar menu will appear. Choose the “My Transactions” option.
- By selecting this option, you can access your transaction history, which includes a list of all your current and past transactions.
To create a new profile, click on your username at the top of the page. You may choose to add a new profile or copy your existing profile when creating a new profile to speed up the process.
To edit your profile, click on the “Me” page to view your current profile and click the edit icon next to any of the fields that you wish to change.
Privacy options allow you to set who can view your profile. For example, if you would like to find golf buddies, you may set that your profile can only be visible to users who are interested in golf by inputting golf in the interests field. The privacy options include interests, professions, personalities, favourite cities, residing cities, language, REN tier, age, gender, horoscope, zodiac, height, weight, profile with photos, and many more.
If you have multiple profiles already, you can tap on your username, and select the profile that you wish to swap to. You may also add a new profile from the menu.
To delete a profile, in the main tab below, click on your username in the side menu or in the middle at the top of the page, once you are in your profile, tap the three dots icon at the top right corner, and select Delete Profile. Ensure that you are in the correct profile before you delete your profile. Deleting a profile is an irreversible action. You may not delete your profile if it is the only profile left in your account.
You need to input information into your profile, the more complete and informative the profile is, the higher the matches will be. Also, YOU+ subscribers appear more frequently.
To add a new contact on YouApp, navigate to People, fill up what is this profile looking for to search for people that you want to match with. You may then search for the user that you wish to add. Tap on the image to open the user’s profile. Tap the “user-plus” icon at the bottom left to add contact. The system will show a popup. Tap “Add Contact” to confirm.
You may also add new contacts by sharing your invite link/QR code.
To initiate a new chat, you must first match with individual users. Once matched, you can click the “Messages” button to begin a conversation. For free users, if your compatibility score is below 70%, you are free to chat without any restrictions. However, if your compatibility exceeds 70%, you will need to be subscribed to YOU+ in order to engage in a conversation.
Go to Groups from the main tab. Select the group you wish to join and tap on the group image. If the group requires payment to join, you may make REN payment or direct purchase with your default currency selected. Take note that you agree to the rules or terms of the group when you join the group.
In the Messages page, click the “+” button and select “Create Group.” Fill in the details for your new group, such as the cover photo, name, keywords, and set the group to private or public. The more information filled, the easier it will be to find your group. Then, add participants to the group via “My Contacts.”
Groups without any privacy settings are automatically listed in Groups.
To be ranked higher, have more people in the group and fill in more information in the group details.
You can share the link of your group to invite more people.
You may also add members to a group manually by tapping the icon or name of the group, then tap the three dots icon and tap Add Members.
Only group owners can delete the group. As an owner, enter your group, tap the group icon or name of your group, then tap the three dots icon and select Delete Group in the menu. Press confirm to delete the group. Deleted groups are not recoverable.
Go to Experiences from the main tab. Search for the experience that you wish to purchase, select the currency and the number of guests, and make payment in REN or direct purchase. Take note that you agree to the terms of the experience when you buy it.
Go to Events from the main tab. Search for the event that you wish to purchase, select the currency and the number of guests, and make payment in REN or direct purchase. Take note that you agree to the terms of the event when you buy it.
Before start exploring matches you must submit verification for your profile. Why do you need to do badge verification? We maintain the highest level of verification because we want you to connect with genuine people, not fake bots or scammers
To submit badge verification, follow these steps:
- Click on the YouApp logo located at the top left corner or you can access after doing matches on boarding.
- The system will unveil the sidebar menu, where you can access the “Verification” option.
- Tap on this option and proceed to “Verify Identity,” where you’ll need to provide all necessary details.
- Once completed, hit “Submit” and await approval from YouApp’s admin team.
To submit KYC as an Individual, tap the top left YouApp icon, then tap Verification, and select Individual Verification.
Please ensure that you have prepared the following documents:
- Passport/Identity Card proof (Scan copies)
- Proof of Residence (utility bills/telco bills/govt letters)
- Selfie with Passport/Identity card and date written on paper
To submit KYC as a business, you will need to have submitted the individual KYC as well.
To go to the page to submit KYC, tap the top left YouApp icon, then tap verification, then select Business Verification after you have submitted the individual KYC.
Please ensure that you have prepared the following documents:
Business Certification
Beneficiaries Information
- Beneficiaries Particulars
- Passport/Identity Card Proof
- Proof of Residence (utilities bill, telco bills, government letters)
- Selfie holding Passport/Identity Card
Official Bearer Information
- Bearer Particulars
- Passport/Identity Card Proof
- Proof of Residence (utility bill, telco bills, government letters)
- Selfie holding Passport/Identity Card.
It may take up to 3 business days to be processed.
Tap the YouApp icon in the top left corner and tap on Notification.
Tap the YouApp icon at the top left corner and tap on Account Settings.
Add: Open Account Settings > Tap Email > Enter your Email > YouApp will send an email verification OTP. Enter the OTP into the App to verify your email.
Edit: Open Account Settings > Tap Email > Enter new email > Re-enter Email > YouApp will send an email verification OTP. Enter the OTP into the app.
Add Mobile Number: Open Account Settings > Tap Mobile Number > YouApp will send an OTP > Enter the OTP to confirm your mobile number.
Edit Mobile Number: Open Account Settings > Tap Mobile Number > YouApp will send an OTP > Enter the OTP > Enter New Mobile Number > YouApp will send OTP > Enter the OTP to confirm your new mobile number.
Connect: Tap the YouApp icon on the top left corner, go to your Account Settings then tap on “Social Login”. In the Social Login and tap on Facebook/Google/Apple to connect your account.
Disconnect: Tap the YouApp icon on the top left to go to your Account Settings then tap on “Social Login”. In the Social Login and tap on Facebook/Google/Apple to disconnect your account.
iOS: Go to your phone’s Settings > Notifications > YouApp
Android: Go to your phone’s Settings > YouApp > Notifications
To delete your account, select the YouApp icon on top left of the screen, and select “Account Settings”. All the way down, there will be a delete account button. Tap the button and enter the reason for deleting. An OTP will be sent to your mobile phone or email. Enter the OTP to delete your account permanently.
YouApp applies a 10% convenience fee, which is included in the total amount payable. This means that the price you see when making a purchase is the final amount payable.
There are two methods of sharing experiences: one within the app and the other outside the app.
To share an experience within the app, click on the “…” button located at the top right corner. From there, you’ll find a “share” button. Upon clicking it, you’ll be taken to a screen that allows you to select where you want to share the experience (either through a chat or a group chat). After choosing, select the contact you want to share with and click “send.”
For sharing experiences outside YouApp, start by clicking on the “…” button at the top right corner. Once you see the “share” button, click it. This will take you to the chat and group chat screen. From here, click the “share” button again at the top right corner. This will allow you to choose any app installed on your device to share with. You can then select the desired app to proceed with sharing.
There are two methods of sharing event: one within the app and the other outside the app.
To share an event within the app, click on the “…” button located at the top right corner. From there, you’ll find a “share” button. Upon clicking it, you’ll be taken to a screen that allows you to select where you want to share the event (either through a chat or a group chat). After choosing, select the contact you want to share with and click “send.”
For sharing event outside YouApp, start by clicking on the “…” button at the top right corner. Once you see the “share” button, click it. This will take you to the chat and group chat screen. From here, click the “share” button again at the top right corner. This will allow you to choose any app installed on your device to share with. You can then select the desired app to proceed with sharing.
There are two methods for sharing a group: one within the app and the other outside the app.
To share a group within the app, click on the group title at the top, scroll down to the Group Link section, and you will find the Share Link option. Upon clicking it, you’ll be directed to a screen that allows you to choose where you want to share the link (either through a chat or a group chat). After making your choice, select the contact you wish to share with and click “send.”
For sharing a group outside of YouApp, click on the group title at the top, scroll down to the Group Link section, and you will see the Share Link option. This will take you to the chat and group chat screen. From here, click the “share” button again at the top right corner. This will provide you with the option to select any app installed on your device to share the link with. You can then choose the desired app to proceed with sharing.
IOS Guide for enable photo permission on YouApp
- Navigate to Settings:
Locate and tap on the “Settings” app on your home screen. It usually has a gear icon.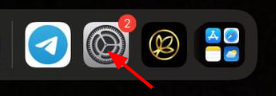
- Scroll Down and Find the YouApp:
Scroll down the Settings menu until you find YouApp then tap on it to enable photo permissions.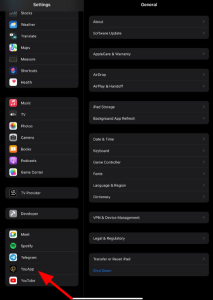
- Or if you want to access it from YouApp Itself, Click Open Setting:
Click open setting text if you found this page on the YouApp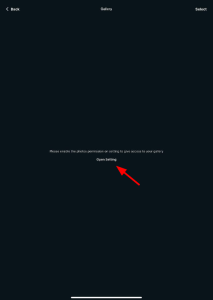
- Find “Photos” in the App Settings:
Scroll through the settings of the app until you find “Photos” or “Media” or something similar. Tap on it to access photo-related permissions.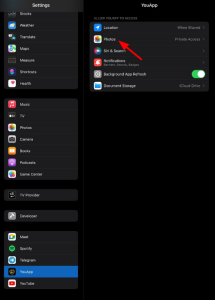
- Enable Photo Permissions:
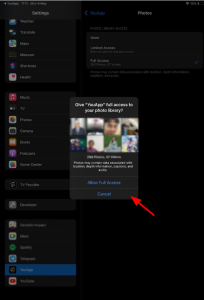
In the Photos settings for the app, you should see options related to photo access, such as “Allow Access to Photos” or “Photo Library Ac.” Toggle the switch to enable access. It may appear as “Limited Access” or “Full Access”.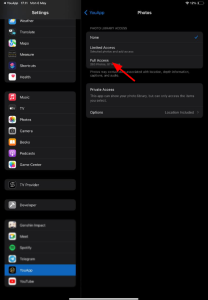
- Click on Allow Access
- Return to the App:
After enabling photo permissions, press the Home button to return to the home screen or use the swipe gesture to exit Settings and return to your home screen.
- Test the App:
Open YouApp again and check if you can now access photos or media as intended. If the permission was successfully enabled, you should now be able to access your photos within the app.